Chapter 1. Getting started with OpenIMAJ using Maven
Apache Maven is a project management tool. Maven performs tasks such
as automatic dependency management, project packaging and more. We
strongly encourage anyone using
OpenIMAJ to use Maven to get their own project started. We’ve even
provided a Maven archetype for
OpenIMAJ (basically a project template) that lets you get started
programming with OpenIMAJ quickly.
OpenIMAJ requires Maven 2 or 3; if you want to build OpenIMAJ from source you will need Maven 3. You can check if you
have Maven installed
already by opening a terminal (or DOS command prompt) and typing:
mvn -version
If Maven is found the, version will be printed. If the version is
less than 2.2.1, or Maven was not found, go to
http://maven.apache.org
to download and install it. Once you’ve installed Maven try the
above command to test that it is working.
To create a new OpenIMAJ project, run the following command:
mvn -DarchetypeCatalog=http://maven.openimaj.org/archetype-catalog.xml archetype:generate
Maven will then prompt you for some input. Firstly, when prompted,
choose the openimaj-quickstart-archetype and
choose the latest version. For the groupId, enter
something that identifies you or a group that you belong to (for
example, I might choose uk.ac.soton.ecs.jsh2 for
personal projects, or org.openimaj for OpenIMAJ
sub-projects). For the artifactId enter a name
for your project (for example,
OpenIMAJ-Tutorial01). The version can be left as
1.0-SNAPSHOT, and the default package is also OK.
Finally enter Y and press return to confirm the
settings. Maven will then generate a new project in a directory with
the same name as the artifactId you provided.
![[Note]](https://openimaj.sourceforge.net/tutorial/images/note.png) |
Overriding the OpenIMAJ version |
|
Versions of the archetype after 1.0.5 automatically select the corresponding
OpenIMAJ version. With all versions of the archetype, you can override this
by setting the openimajVersion on the command-line with the -D argument.
|
The project directory contains a file called
pom.xml and a directory called
src. The pom.xml file
describes all of the dependencies of the project and also contains
instructions for packaging the project into a fat jar that contains
all your project code and resources together with the dependencies.
If you find that you need to add another library to your project,
you should do so by editing the pom.xml file and
adding a new dependency. The src directory
contains the code for your project. In particular,
src/main/java contains your java application code
and src/test/java contains unit tests.
The default project created by the archetype contains a small
“hello world” application. To compile and assemble the
“hello world” application you cd
into the project directory from the command line (replacing
OpenIMAJ-Tutorial01 with the name of your
project):
cd OpenIMAJ-Tutorial01
and run the command:
mvn assembly:assembly
This will create a new directory called target that contains the
assembled application jar (the assembled jar is the one whose name
ends with -jar-with-dependencies.jar). To run the application,
enter:
java -jar target/OpenIMAJ-Tutorial01-1.0-SNAPSHOT-jar-with-dependencies.jar
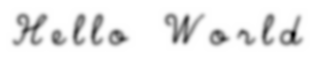
The application will then run, and a window should open displaying a
picture with the text “hello world”. Closing the
window, or ctrl-c on the command line, will quit the application.
1.1. Integration with your favourite IDE
We could now go ahead and start playing with the code in a text
editor, however this really isn’t recommended! Using a good
Integrated Development Environment (IDE) with auto-completion will
make your experience much better.
Maven integrates with all the popular IDEs. The OpenIMAJ
developers all use Eclipse
so that is what we’re most familiar with, however we should be
able to help getting it set up in a different IDE if you wish.
Integration with Eclipse is quite simple. From the command line,
inside the project directory, issue the command:
mvn eclipse:eclipse
This will generate Eclipse project files in the same directory. In
Eclipse you can then import the project into the Eclipse workspace
( > , choose Existing projects into
workspace, select the project directory, make sure
Copy projects into workspace is
unchecked, then click
Finish). The project should then appear in the
workspace and you’ll be able to look at the App.java file that was
generated by the archetype.
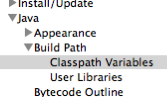
IMPORTANT By default Eclipse
doesn’t know about Maven and its repositories of jars. When you
first import an OpenIMAJ project into Eclipse it will have errors.
You can fix this by adding a new Java classpath variable
( > > Java >
Build Path > Classpath Variables) called
M2_REPO. The value of this variable is the
location of your .m2/repository directory. For
Unix systems this is usually found in your home directory, for
Windows systems it is found in C:\Documents and Settings\<user>\.
Once you’ve opened the App.java file in
Eclipse, you can right-click on it and select
> to run it from
within Eclipse.
![[Tip]](images/tip.png)